
Instructional Continuity: Streaming Live or Recording Classes in ZOOM

Cal Poly has a license for ZOOM, a video conferencing software that allows for live streaming or recording of instructors’ lessons, meetings, or office hours. ZOOM allows for video, audio, screen sharing, group breakout rooms, chat, and polling. It can be used from any computer, laptop, tablet, or phone, and it works on Mac, PC, iOS, and Android devices with the ZOOM app downloadable from the Apple App Store (iOS) or Google Play (Samsung and Android).
Cal Poly ZOOM: https://calpoly.zoom.us
Zoom is a trusted partner of the California State University (CSU) system, and our contract with them obligates the company to protect our data. Cal Poly has also taken additional steps to ensure Zoom is secure for our students, faculty, and staff to conduct university business. We have controls in place to prevent intrusion, including the use of Cal Poly username and password authentication and enabling passwords for meetings. We have also ensured meeting recordings are protected and can’t be kept by participants. We will continue to work with faculty and staff so they feel comfortable using Zoom and know how to set the appropriate defaults for maximum security.
Students: Please go to the ZOOM for Students Page
Topics:
(Click on the links below to jump to a specific topic on this web page)
ZOOM Training Options
Zoom Tips for Better Virtual Teaching
- Zoom Tip #1 - Taking Attendance in Zoom
- Zoom Tip #2 - Provide Files in the Zoom Chat
- Zoom Tip #3 - Video & Audio Settings Considerations
- Zoom Tip #4 - Using an iPad to Annotate in Zoom
Attending a ZOOM Meeting as a Participant
- Joining a ZOOM Meeting as a Participant
- Configuring Your Audio & Video
- Using Virtual Backgrounds in ZOOM
Faculty: Getting Started Teaching with ZOOM
- Scheduling a Meeting in ZOOM
- Tips for Successfully Facilitating a Meeting in Zoom (PDF)
- Suggested ZOOM Settings for Class
- Important ZOOM Security Settings
- Starting a Meeting as the Host
- Roles in a ZOOM Meeting
- Managing Participants in a ZOOM Meeting
- Recording a Meeting to the ZOOM Cloud
- Accessing Your Recordings
- Recording Layouts in a ZOOM Meeting
- Using the ZOOM Plug-in in Canvas (LMS)
- Embedding Zoom Recordings in Canvas (LMS)
- ZOOM for Students (Share with your students)
ZOOM's Special Features
- Sharing Your Screen
- Managing & Saving In-Meeting Chat
- Using ZOOM's Waiting Room for Holding Office Hours
- Using ZOOM's Polling Feature
- Using ZOOM's Breakout Rooms for Group Collaboration
Accessibility
- Automatically Transcribe ZOOM Cloud Recordings
- Edit ZOOM's Automatic Captions & Share Your Video with Your Students
- Using Otter to "Live Caption" Your ZOOM Presentation for DRC Students
- Other Options for Captioning for "Live" and Recorded Lectures
Mobile ZOOM
- Downloading & Using the ZOOM App on iOS or Android
- iOS Screensharing on iPads Via Your Computer Desktop Client
- iOS Screensharing Directly From Your iPad ZOOM App
ZOOM Security Updates
Hardware Suggestions for ZOOM
Links to Other ZOOM Resources
- ZOOM Help Center
- More ZOOM Video Tutorials
- ZOOM Best Practices for Instructors - CSU Channel Islands
- ZOOM for Students
- ZOOM FERPA Compliance
- ZOOM Etiquette
ZOOM Training Options
ZOOM Webinars - Recorded Videos
Note: The following "live" webinar was recorded to the ZOOM cloud with automatic captions. The captions have not been edited yet but will be corrected at a future date.
Virtual Teaching in ZOOM Webinar Recording (2:14:57)
Open Faculty Q&A starts at approx. 1:39:16
Video: ZOOM Training for Educators (45 minutes)
This video at the link below was created by a ZOOM employee during a "live" training in Australia. It is an excellent starting point as a beginning ZOOM learner and will give you a "feel" for how ZOOM looks to your participants. When you open the link, you will see the audio transcript to the right. If you want to save time and skip to topics you are interested in, just click on the audio transcript text while playing the video, and the recording will jump to that particular section.
Please read the section on Scheduling a Meeting below as due to our Cal Poly ZOOM license, we host and schedule meetings through the Cal Poly ZOOM link, NOT through the ZOOM company link or through the ZOOM app that is downloaded to your computer.
Attending a ZOOM Meeting as a Participant
Joining a ZOOM Meeting as a Participant
If you scheduled the ZOOM meeting, you are considered the "host." If you are joining a meeting that has already been created by someone else, you are a "participant."
The following video shows how a participant should join a meeting. To alleviate questions and anxiety for your students the first time they are asked to join a ZOOM meeting, you may want to share the link to this video with your students via Canvas.
Video: Joining a ZOOM Meeting (1:09)
Configuring Audio & Video in ZOOM
Video: Configuring Audio & Video in ZOOM
Using Virtual Backgrounds in ZOOM
The virtual background feature allows you to display an image or video as your background during a Zoom Meeting. Virtual backgrounds are often used in the movie industry and work best if you have a green screen.
Video: Virtual Backgrounds in ZOOM
Faculty: Getting Started Teaching with ZOOM
Scheduling a Meeting in ZOOM
NOTE: Do not use ZOOM through the company's website. Follow the instructions below to connect to ZOOM through the Cal Poly portal.
-
Go to: https://calpoly.zoom.us
- Select Sign in (Configure your account) > Schedule a New Meeting

- The Cal Poly portal page will appear. Log in with your Cal Poly username and password as you normally would.

-
Video: Scheduling ZOOM Meetings
- If you intend to record your session, we suggest that in the Meeting Options section, you select Record the meeting automatically > In the cloud.
- After you click the Save button, ZOOM will take you to a second set-up page. To add the ZOOM URL info to your own calendar, click on the Outlook Calendar button. Doing this will add a calendar entry with the date, time and ZOOM meeting URL into your Cal Poly calendar (Outlook for Windows; iCal for Mac) in order for you to refer to the URL later when you are sharing the link with participants (students). Do not enter the meeting yourself through this link or you will not have hosting privileges. See To Start a Meeting as the Host above.
- Although you can click on the Copy the invitation link on this second set-up page and send it to your students via email or copy it to your Canvas course, much of that information is confusing to your students. For class meetings, simply copy/paste the Join URL link (e.g., https://calpoly.zoom.us/j/899211154) and send that ZOOM link to your students.
- Alternatively, if students are coming into class on iOS or Android devices, have them download the free ZOOM Cloud Meetings app to their device from the Apple App Store (iOS) or from Google Play (Samsung and Android). There are some imposter apps out there, so make sure they type in “ZOOM Cloud Meetings” in their search for the app (example of the ZOOM app icon shown below). Students can use the ZOOM URL you have provided within their device’s browser and their device will ask them to join by pressing a button to open the ZOOM app that is installed on their device.

- At a later time, when you wish to start the class meeting, simply click on the ZOOM Meeting URL to start your meeting from your computer or device.
Suggested ZOOM Settings for Class
Below are our suggested settings to TURN ON PERMANENTLY to allow the best ZOOM experience and access to the tools you will most likely want to use. Make sure that these settings are turned on and you'll have more availability to ZOOM tools that haven't been set as the default by ITS. (Note: The button to the right of these settings is blue when turned on, gray when turned off)
To access Settings, log in through the Cal Poly ZOOM site calpoly.zoom.us, click on Sign in (Configure your account), and then select Settings in the left menu bar.
- Mute Participants on Entry
- Chat & Auto-saving chats
- Turn off Play sound when participants join or leave
- Polling
- Screen Sharing settings
- Annotation
- Whiteboard
- Do not allow removed participants to rejoin
- Breakout room
- Closed captioning
- Save Captions
- Virtual background
- Stereo audio
- Waiting room (Office hours)
- Email notification when a cloud recording is available
- Notify when cloud recording to be permanently deleted
Important ZOOM Security Settings
Concerned about your ZOOM security settings? Watch the video below where our previous CTLT Multimedia Specialist, Luanne Fose, demonstrates what security settings should be enabled and disabled in order to protect your ZOOM classroom experiences from uninvited participants.
Video: Tips for Zoom Security Settings
PDF: Quick Overview of Tips for Zoom Security Settings
STARTING a Meeting as the Host
1. Go into ZOOM through the calpoly.zoom.us website, select Sign in (Configure your account).
2. The Cal Poly Single Sign-On Portal web page will appear. Sign in as you normally would into the portal.
3. Find the exact meeting that you scheduled from Meetings > My Meetings and click on the Start button for that particular meeting. If you go in through the ZOOM app as the participants (i.e., students) would do, you may not have all the hosting rights and tool choices that are granted to the host or alternative host(s).
Roles in a ZOOM Meeting
There are basically 4 roles in a ZOOM meeting: Host, Alternative Host, Co-Host, and Participant. Please watch the video below to understand the different roles that can be assigned. Note: An alternative host can schedule meetings for someone else and also start a meeting in the host's absence. Co-hosts cannot start a meeting for a host. Also, the host cannot assign a co-host until the host has started the meeting, but a meeting can have up to 50 co-hosts. If you want someone to serve as a moderator in a meeting, helping you manage chat questions, etc., it is best to assign the moderator co-host privileges.
Video: Host and Co-Host Controls in a ZOOM Meeting
Managing Participants in a ZOOM Meeting
As the host in a meeting, you can manage the participants. By default, any participant in a meeting can share their video, screen, and audio. Learn more about managing your meeting participants below.
Video: Managing Participants in a ZOOM Meeting
Recording a Meeting to the ZOOM Cloud
Video: Recording a ZOOM Meeting
Standard Meeting View
If you don’t turn on the option to record the ZOOM meeting automatically when you schedule your meeting, you can turn on recording when you are in the meeting itself. In Standard Meeting View, the Record button is located at the bottom of your ZOOM window.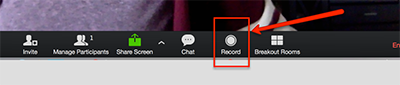
Screen Sharing View
When sharing your screen with meeting participants, the Record button is located at the top of the screen under the More… button.
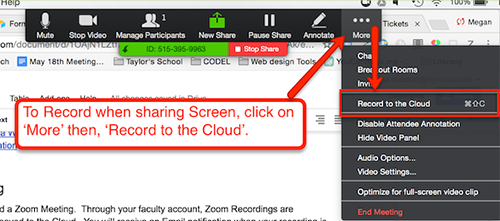
NOTE: If you wish to display a PowerPoint, Keynote, browser page, Word or PDF document, a particular software, or other types of presentations with your students in the ZOOM meeting, be sure to share the screen by clicking on the Share Screen button in ZOOM. If the screen is not shared with your students in ZOOM, it won't be captured in the recording.
Note: Students DO NOT have that ability to record to the ZOOM cloud for videos that they create themselves, but they do have the ability to save their own recordings locally to their own computer (without captions) by selecting Record > Local Recording.
You can record your lecture in ZOOM and then share it with students to view asynchronously. Through your faculty/staff ZOOM account, you can choose to save your recording either to the cloud or locally to your computer. With cloud recordings, you will receive an email notification when your recording is ready, with a link to your recording.
Alternatively, you can also locate your recordings by going back into ZOOM through the calpoly.zoom.us link. Select Sign in (Configure your account) and then click on the Recordings link in the left navigation menu.
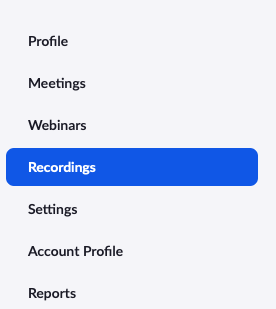
To access your ZOOM recording that you sent to the cloud, enter ZOOM through the calpoly.zoom.us link, select Sign in (Configure your account), and then click on Recordings in the left navigation menu.
- You will have the choice to choose from Cloud Recordings or Local Recordings. Choose Cloud Recordings for that is where the audio transcript for closed captions resides.

- Note: The only way to have ZOOM add automatic captions for ADA compliance is to record it to the ZOOM cloud. After the recording has been processed and the captions have been automatically added in the ZOOM cloud, you will receive an email notification with a link to the recording with the captions embedded. After your recording is finished processing in the cloud, you can download the video to your computer for safekeeping.
If you are low on personal computer storage, you can upload your video to Microsoft Office 365 in the Cal Poly portal for safekeeping or upload it to YouTube and have YouTube add its automatic captions. ZOOM has more accurate captioning via a tool it utilizes for captions called "Otter"; however, both ZOOM cloud and YouTube can add captions that you can then edit afterward. If you wish to keep ZOOM's excellent captions, you can download the .vtt file (Audio Transcript) that appears on ZOOM's Recording page for your particular meeting and then upload that audio transcript .vtt file (caption file) to YouTube if you decide to upload the ZOOM video to YouTube.
If you decide to upload your ZOOM videos to YouTube, make sure you post them as either Public or Unlisted. Unlisted gives you more privacy because only people you are given the link can view the video. DO NOT choose Private on YouTube as that only allows 25 people to view it and then no one else can get in.
If your video is longer than 15 minutes, you will need to do an extra step to ask YouTube for more room. Go to Uploading Video into YouTube Longer Than 15 Minutes.
Also see: Edit ZOOM's Automatic Captions & Share Your Video with Your Students in the Accessibility section of this web page.
Recording Layouts in a ZOOM Meeting
There are several recording layouts for local and cloud recordings depending on the video layout of your meeting. Learn more about them.
Video: Layouts in ZOOM
Using the ZOOM plug-in in Canvas (LMS)
ZOOM is now integrated into Cal Poly Canvas courses and can be accessed by faculty from the course menu. Students will access created meetings from the notifications that are sent out through the Canvas Inbox or from the Canvas Course calendar.
Support Page: ZOOM in Canvas from the Cal Poly Canvas Support site
Embedding Zoom Recordings in Canvas (LMS)
Did you know that you can embed a Zoom recording in Canvas? Instead of just putting the link in your Canvas course, place the Zoom video there for easy viewing within Canvas
Video: Embedding ZOOM Recordings in Canvas
ZOOM for Students
Help your students get off to a good start by offering them this link in your online Canvas course to the ZOOM for Students web page.
ZOOM's Special Features
Sharing Your Screen
- Watch the ZOOM Video on Sharing Your Screen
- Watch the ZOOM Video on Screen Sharing a PowerPoint Presentation
- Check out the instructions on Screen Sharing a Keynote Presentation
- More info on Screen Sharing Options at ZOOM Support
Managing & Saving In-Meeting Chat
Support Page: Managing In-Meeting Chat
Support Page: Saving In-Meeting Chat
Using ZOOM's Waiting Room for Office Hours
Support Page: ZOOM's Waiting Room
Using ZOOM's Polling Feature
Video: Polling in ZOOM Meetings
Video: Polling in ZOOM (YouTube Newest Version)
Using ZOOM's Breakout Rooms (For Group Collaborations)
Video: Getting Started with ZOOM Breakout Rooms
Video: Instructional Video for Zoom Breakout Room Participants
Accessibility
Automatically Transcribe ZOOM Cloud Recordings
Captioning for educational videos is required by law.
Video: Automatically Transcribe ZOOM Cloud Recordings
NOTE: To have an audio transcript file created for captions (.vtt file) make sure that you have the Audio transcript option selected in your ZOOM settings by going to Settings > Recordings in your Cal Poly ZOOM account left menu bar and selecting the checkbox next to Audio transcript. You only have to do this one time and then you will always receive audio transcript (.vtt) files along with your .mp4 video file stored in the ZOOM cloud. We highly suggest that you turn this feature on! Having the audio transcript file can be especially helpful if you wish to place your recording in Vimeo, YouTube, or Office 365 later.
Edit ZOOM's Automatic Captions & Share Your Video with Your Students
- In ZOOM, all of your recordings will appear in a list when you click on Recordings. Click on the link of the name of the recording you wish to access (e.g., Diving Deeper Training).

- Click on the link labeled Shared screen with speaker view.
- You will be taken to a view of the video on the left side of the screen and the audio transcript box on the right side of the screen. Click on the text of the first paragraph in the audio transcript box, and then click on the pencil that appears to the right of the paragraph.
- You will now be able to edit the paragraph within the audio transcript. Click on the Play button below the video on the left side of the screen and listen to the audio as you review the transcript on the right side of the screen. Edit as needed and then click the Save button for each caption box. Continue correcting the audio transcript in this manner by clicking on the remaining paragraphs, editing as needed, and saving each box that you edited. When the viewer clicks the CC button, they can see the captions embedded at the bottom of the video.
- Return to the ZOOM Recordings page and click on the Share… button at the far upper right of your recordings' link.

- Select the option for Share this recording > Publicly and if you wish, select Viewers can download.
- Click the Copy to Clipboard button to copy the ZOOM link information to the clipboard of your computer for sharing with your students.

- Finally, click the Close button to close the pop-up window for Share this cloud recording.
- Use Command-V (Mac) or Control-V (Windows) to paste the Meeting Recording link in an email to send to your students and/or place it somewhere in your Canvas course for students to access.
- If you recorded your video to ZOOM’s Cloud instead of Local Recordings when you share the recording with your students via the ZOOM Share… link, your students will see the captions in the closed caption view at the bottom of the video screen when they click on the CC button.
Using Otter to "Live Caption" Your ZOOM Presentation for DRC Students
Our CTLT accessibility specialist and instructional designer, Pam Dougherty, shares how to use Otter (a free download application) to "live caption" your ZOOM presentation for those students who have registered with the DRC. Check out her demonstration in the video below.
Video: Demo of Using Otter with ZOOM for Live Captioning - Pam Dougherty
Other Options for Captioning for "Live" & Recorded Lectures
Support Page: Captioning for "Live" & Recorded Lectures
Mobile ZOOM
Downloading & Using the ZOOM App on iOS or Android
Although this video was made by Michigan State, it will show you how to download and use the ZOOM app on iPhones, iPads, and Android devices. When they are discussing the Single Sign-on, as a Cal Poly user, you would sign on to the Cal Poly portal.
Video: Using the ZOOM Mobile App (Michigan State University)
iOS Screen sharing on iPads Via Your Computer Desktop Client (Recommended)
Support Page: iOS Screensharing with the ZOOM Desktop Client
iOS Screen sharing Directly From Your iPad ZOOM App
Note: You cannot share and annotate on your entire screen if you choose to screen share directly from your iPad. This is why the above approach of screen sharing on your iPad via your ZOOM Desktop Client on your computer is recommended.
Support Page: iOS Screensharing Directly From Your iPad ZOOM App
ZOOM Security Updates
Security Update: April 16, 2020 - Tips for ZOOM Security settings
Concerned about your ZOOM security settings? Watch the video below where our previous CTLT Multimedia Specialist, Luanne Fose, demonstrates what security settings should be enabled and disabled in order to protect your ZOOM classroom experiences from uninvited participants.
Video: Tips for Zoom Security Settings
PDF: Quick Overview of Tips for Zoom Security Settings
Security Update: April 3, 2020 - Waiting Room imposed by zoom
In an effort to secure Zoom meetings from outside interruptions from uninvited parties, referred to as Zoom Bombing, the company ZOOM has imposed turning on the Waiting Room for all Zoom meetings. This obligatory setting has been turned on in order to allow the meeting host to selectively choose who should be admitted to a meeting. The danger of Zoom-Bombing can be somewhat mitigated if faculty choose “Only authenticated users can join” in the Meeting Options area while scheduling a meeting through the website from a computer, https://calpoly.zoom.us, rather than scheduling within the Zoom app. If you already scheduled recurring Zoom meetings, but want to make sure students are authenticated via the Cal Poly Portal, you can navigate to Meetings > My Meetings, find the first occurrence of your meeting and click on its blue link to open it. Navigate to the bottom of the scheduling page and click on the Edit this Meeting button and change your settings to enforce user authentication for all recurring meetings by selecting "Only authenticated users can join." Be sure to click on the Save button at the bottom of the page.
Faculty should be aware that when they start a meeting, students in the “Waiting Room” need to be admitted. Please watch this Waiting Room Zoom video to learn more about how to quickly admit participants. (Note: Since the time that the above-mentioned video was created by Zoom, there has been an update to the Zoom app software. Now as a host you will see a Security button at the bottom of the screen where you can turn off the “Enable Waiting Room” option. You may also want to make sure you turn off the option there for participants to rename themselves so that you can be sure that their names match your roster.) Make certain in the Participants panel (previously Manage Participants), that all students have been admitted into the meeting even if you have turned off the “Enable Waiting Room” option within the Security button.
Click here for more information about the recent Zoom App update
Tips for Preventing ZOOM Bombing
Zoom Bombing is a recent issue that has been happening with increased frequency as many instructors move to virtual instruction. Zoom Bombing is a term to describe a specific type of online harassment in which an outside participant enters a meeting and shares inappropriate content, harasses the presenter or participants, or otherwise disrupts the meeting. Oftentimes, the intent of Zoom Bombing is to share explicitly racist, sexist, or other oppressive materials or hate speech. Read more about how to prevent Zoom Bombing by turning on and off specific settings in your ZOOM meeting.
Support Page: CTLT - Preventing Zoom Bombing
Hardware Suggestions for ZOOM
External Microphone Suggestions for ZOOM
Although you can use your computer's microphone for ZOOM, you may wish to upgrade to an external microphone. Besides the advantage of your students being able to hear you more clearly, an external microphone increases the accuracy of your video captions. Save yourself time with editing audio captions by getting a better microphone. Here are some suggestions listed from cheap (but good) to more expensive, including links to Amazon:
- Apple Earpods for iPhone with Lightning Connector (approx. $20)
- Mpow Flame Bluetooth Headphones Sport IPX7 (approx. $25)
- CMTECK USB Computer Microphone for Mac or Windows (approx. $25)
- Sennheiser PC8 USB Stereo Headset for PC and Mac with In-Line Volume and Mute Control (approx. $30)
- Koss Headphones (CS100-USB) - Small Earpieces (approx. $25)
- Koss Headphones (SB45 USB) - Large Cushioned Earpieces (approx. $30)
- Samson Go Mic Portable USB Condenser Microphone (approx. $30)
- Blue Yeti USB Mic for Recording & Streaming on PC and Mac (approx. $125)
- Samson G-Track Pro Professional USB Condenser Microphone with Audio Interface (approx. $150) - my current personal favorite! Cheaper at Sweetwater
- Rode MT-USB Versatile Studio-Quality USB Cardioid Condenser Microphone (approx. $170)
- Bose QuietComfort 20 Acoustic Noise Canceling Headphones (approx. $250) Be sure to select the proper model for either Apple or Samsung/Android devices.
NOTE: Make sure you have the right connection for your particular computer in terms of USB, Lightning, USB-C, etc. If you need an audio adapter from your microphone to your computer's connector, check out the following: Audio Adapters at Apple
External Hardware for Writing Equations in ZOOM
ZOOM has an Annotation tool, but unless you have a drawing tablet that hooks to your computer via USB, it isn’t easy to write intricate equations with the ZOOM Annotation tool. However, if you have an iPad or Surface Tablet and a stylus, you should be able to share your screen using the iOS or Android ZOOM app on the device and write equations with ease that are projected to your students via ZOOM.
Another option for writing equations is to consider using an external document camera such as the IPEVO V4K Ultra High Definition 8MP USB Document Camera (approx. $100) and connect it to your computer via the USB port and share your computer screen in ZOOM.
Many instructors have found that using a Wacom tablet (such as the Intuos, approx. $80) and an application on your computer, such as OneNote (available from Cal Poly) allows you to draw equations with Wacom pen as you record your simultaneous drawing and audio within ZOOM by sharing your screen. This method works great on both Mac and Windows computers!
Links to Other ZOOM Resources
- ZOOM Help Center
- More ZOOM Video Tutorials
- ZOOM Best Practices for Instructors - CSU Channel Islands
- ZOOM for Students
- ZOOM's FERPA Compliance
- ZOOM Etiquette


